Ingest MQTT Data into InfluxDB
TIP
EMQX Enterprise Edition features. EMQX Enterprise Edition provides comprehensive coverage of key business scenarios, rich data integration, product-level reliability, and 24/7 global technical support. Experience the benefits of this enterprise-ready MQTT messaging platform today.
InfluxDB is a database for storing and analyzing time series data. Its powerful data throughput capability and stable performance make it very suitable to be applied in the field of Internet of Things (IoT). EMQX now supports connection to mainstream versions of InfluxDB Cloud, InfluxDB OSS, or InfluxDB Enterprise.
This page provides a comprehensive introduction to the data integration between EMQX and InfluxDB with practical instructions on creating and validating the data integration.
How It Works
InfluxDB data integration is an out-of-the-box feature in EMQX that combines EMQX's real-time data capturing and transmission capabilities with InfluxDB's data storage and analysis functionality. With a built-in rule engine component, the integration simplifies the process of ingesting data from EMQX to InfluxDB for storage and analysis, eliminating the need for complex coding. EMQX forwards device data to InfluxDB for storage and analysis through the rule engine and Sink. After analyzing the data, InfluxDB generates reports, charts, and other data analysis results, and then presents them to users through InfluxDB's visualization tools.
The diagram below illustrates the typical data integration architecture between EMQX and InfluxDB in an energy storage scenario.
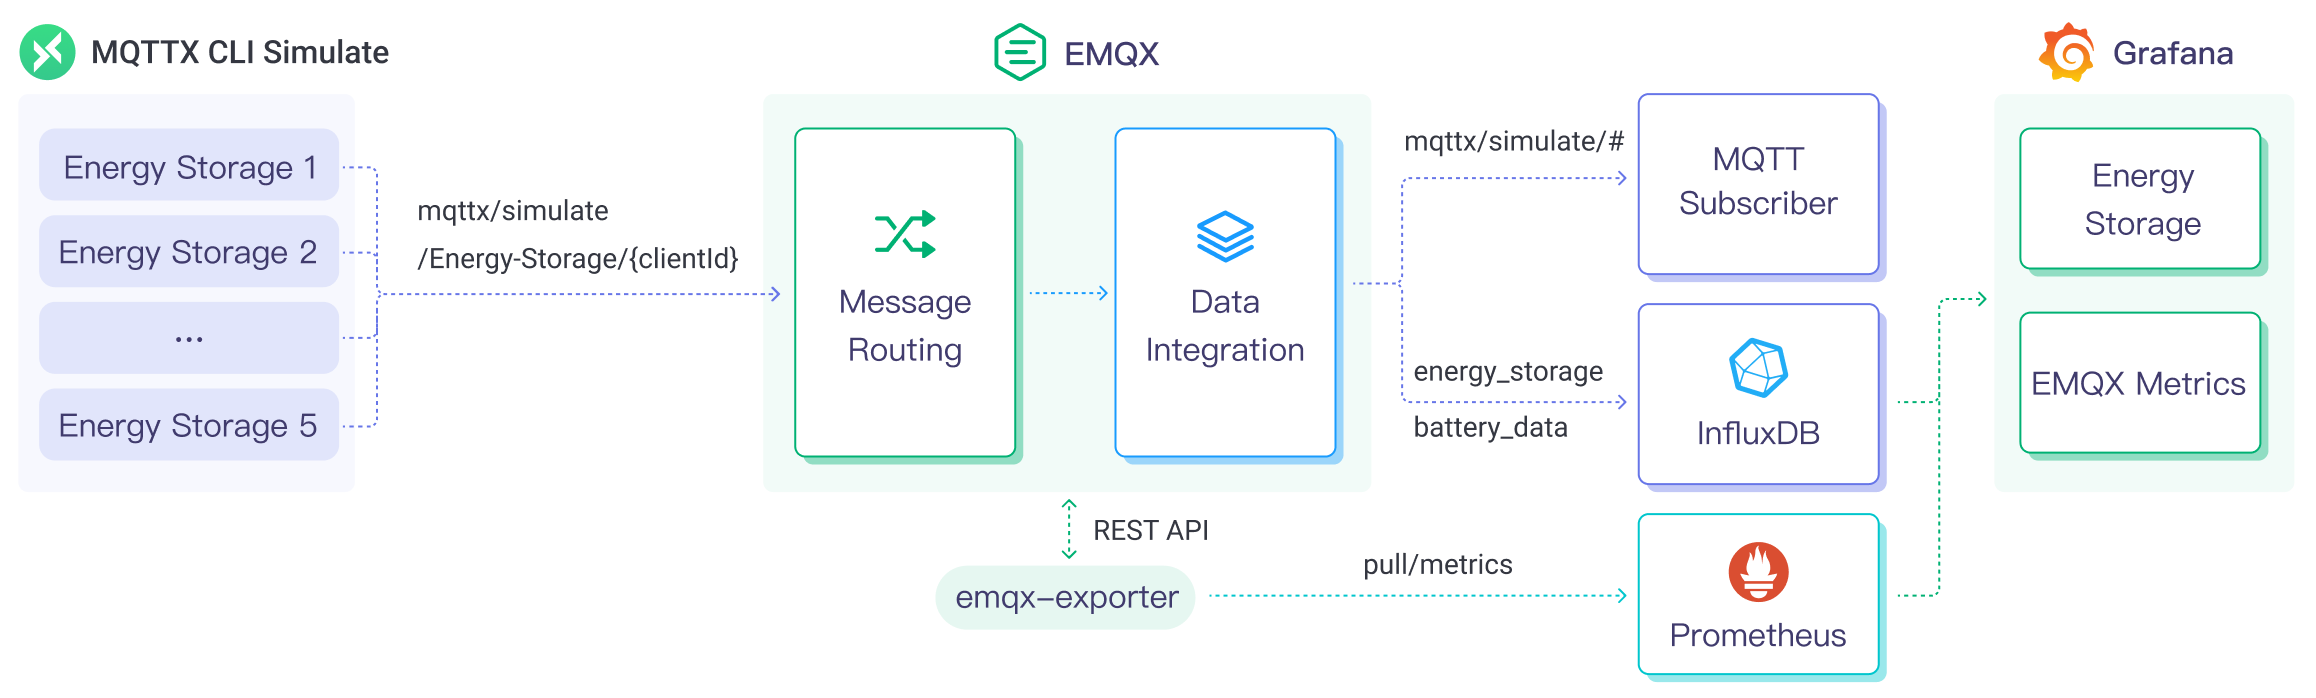
EMQX and InfluxDB provide an extensible IoT platform for efficiently collecting and analyzing energy consumption data in real-time. In this architecture, EMQX serves as the IoT platform, handling device access, message transmission, and data routing, while InfluxDB serves as the data storage and analysis platform, responsible for data storage and analysis functions. The workflow is as follows:
- Message publication and reception: Energy storage devices and Industrial IoT devices establish successful connections to EMQX through the MQTT protocol and regularly publish energy consumption data using the MQTT protocol, including information such as power consumption, input/output power, etc. When EMQX receives these messages, it initiates the matching process within its rules engine.
- Message data processing: Using the built-in rule engine, messages from specific sources can be processed based on topic matching. When a message arrives, it passes through the rule engine, which matches it with the corresponding rule and processes the message data, such as transforming data formats, filtering specific information, or enriching messages with contextual information.
- Data ingestion into InfluxDB: Rules defined in the rule engine trigger the operation of writing messages to InfluxDB. The InfluxDB Sink provides Line Protocol templates that allow flexible definitions of the data format to be written, mapping specific fields from the message to the corresponding measurement and field in InfluxDB.
After energy consumption data is written to InfluxDB, you can use Line Protocol flexibly to analyze the data, for example:
- Connect to visualization tools like Grafana to generate charts based on the data, displaying energy storage data.
- Connect to business systems for monitoring and alerting on the status of energy storage devices.
Features and Benefits
The InfluxDB data integration offers the following features and advantages:
- Efficient Data Processing: EMQX can handle a massive number of IoT device connections and message throughput, while InfluxDB excels in data writing, storage, and querying, providing outstanding performance to meet the data processing needs of IoT scenarios without overburdening the system.
- Message Transformation: Messages can undergo extensive processing and transformation through EMQX rules before being written into InfluxDB.
- Scalability: Both EMQX and InfluxDB are capable of cluster scaling, allowing flexible horizontal expansion of clusters as business needs grow.
- Rich Query Capabilities: InfluxDB offers optimized functions, operators, and indexing techniques, enabling efficient querying and analysis of timestamped data, and accurately extracting valuable insights from IoT time-series data.
- Efficient Storage: InfluxDB uses encoding methods with high compression ratios, significantly reducing storage costs. It also allows customization of storage durations for different data types to avoid unnecessary data occupying storage space.
Before You Start
This section describes the preparations you need to complete before you start to create the InfluxDB data integration, including installing and setting up InfluxDB.
Prerequisites
Knowledge about InfluxDB line protocol, as EMQX will follow this protocol when writing data into InfluxDB
Knowledge about EMQX data integration rules
Knowledge about data integration
Install and Set Up InfluxDB
- Install InfluxDB via Docker, and then run the docker image.
# TO start the InfluxDB docker image
docker run --name influxdb -p 8086:8086 influxdb:2.5.1- With InfluxDB running, visit http://localhost:8086. Set the Username, Password, Organization Name, and Bucket Name.
- In the InfluxDB UI, click Load Data -> API Token and then follow the instructions to create all-access tokens.
Create a Connector
This section demonstrates how to create a Connector to connect the Sink to the InfluxDB server.
The following steps assume that you run both EMQX and InfluxDB on the local machine. If you have InfluxDB and EMQX running remotely, adjust the settings accordingly.
- Enter the EMQX Dashboard and click Integration -> Connectors.
- Click Create in the top right corner of the page.
- On the Create Connector page, select InfluxDB and then click Next.
- In the Configuration step, configure the following information:
- Enter the connector name, which should be a combination of upper and lower case letters and numbers, for example:
my_influxdb. - Select the Version of InfluxDB as needed, with the default being
V2. - Enter the InfluxDB server connection information:
- For the Server Host, enter
127.0.0.1:8086. If using InfluxDB Cloud, specify port 443, i.e., enter{url}:443and click Enable TLS to activate TSL connection. - Complete the Token, Organization, and Bucket settings according to the setup in Install and Set Up InfluxDB. Note: If choosing InfluxDB v1, please complete the settings for Database, Username, and Password.
- For the Server Host, enter
- Determine whether to enable TLS. For detailed information on TLS connection options, see TLS for External Resource Access.
- Enter the connector name, which should be a combination of upper and lower case letters and numbers, for example:
- Before clicking Create, you can click Test Connectivity to test if the connector can connect to the InfluxDB server.
- Click the Create button at the bottom to complete the creation of the connector. In the pop-up dialog, you can click Back to Connector List or click Create Rule to continue creating rules and Sink to specify the data to be forwarded to InfluxDB. For detailed steps, see Create a Rule with InfluxDB Sink.
Create a Rule with InfluxDB Sink
This section demonstrates how to create a rule in EMQX to process messages from the source MQTT topic t/# and send the processed results through a configured Sink to InfluxDB.
Go to EMQX Dashboard, and click Integration -> Rules from the left navigation menu.
Click Create on the top right corner of the page.
On the Create Rule page, enter
my_ruleas the rule ID.Set the rules in the SQL Editor, for example, if you want to save the MQTT messages of the topic
t/#to InfluxDB, you can use the SQL syntax below.TIP
If you want to specify your own SQL syntax, make sure that the fields selected (in the
SELECTpart) include all variables in the data format specified in the later configured Sink.sqlSELECT * FROM "t/#"Note: If you are a beginner user, click SQL Examples and Enable Test to learn and test the SQL rule.
Click the + Add Action button to define an action that the rule will trigger. With this action, EMQX sends the data processed by the rule to InfluxDB.
Select
InfluxDBfrom the Type of Action dropdown list. Keep the Action dropdown with the defaultCreate Actionvalue. You can also select a Sink if you have created one. This demonstration will create a new Sink.Enter a name for the Sink. The name should combine upper/lower case letters and numbers.
From the Connector dropdown box, select the
my_influxdbcreated before. You can also create a new Connector by clicking the button next to the dropdown box. For the configuration parameters, see Create a Connector.Specify the Time Precision: Select
millisecondby default.Select Data Format as
JSONorLine Protocolfor how data should be parsed and written into InfluxDB.- For JSON format, define data parsing method, including Measurement, Timestamp, Fields, and Tags. Note: All key values can be variables or placeholders, and you can also follow the InfluxDB line protocol to set them. The Fields field supports batch setting via a CSV file; for details, refer to Batch Setting.
- For Line Protocol format, specify a text-based format that provides the measurement, tag set, field set, timestamp of a data point, and placeholder supported according to the InfluxDB line protocol syntax.
TIP
- To write a signed integer type value to InfluxDB 1.x or 2.x, add
ias the type identifier after the placeholder, for example,${payload.int}i. See also InfluxDB 1.8 write integer value. - To write an unsigned integer type value to InfluxDB 1.x or 2.x, add
uas the type identifier after the placeholder, for example,${payload.int}u. See also InfluxDB 1.8 write integer value.
Advanced settings (optional): See Advanced Configurations.
Before clicking Create, you can click Test Connectivity to test if the Sink can be connected to the InfluxDB server.
Click Create to complete the Sink creation. Back on the Create Rule page, you will see the new Sink appear under the Action Outputs tab.
On the Create Rule page, verify the configured information. Click the Create button to generate the rule.
Now you have successfully created the rule and you can see the new rule appear on the Rule page. Click the Actions(Sink) tab, you can see the new InfluxDB Sink.
You can also click Integration -> Flow Designer to view the topology. It can be seen that the messages under topic t/# are sent and saved to InfluxDB after parsing by the rule my_rule.
Batch Setting
In InfluxDB, a data entry typically includes hundreds of fields, making the setup of data formats a challenging task. To address this, EMQX offers a feature for batch setting of fields.
When setting data formats via JSON, you can use the batch setting feature to import key-value pairs of fields from a CSV file.
Click the Batch Setting button in the Fields table to open the Import Batch Setting popup.
Follow the instructions to first download the batch setting template file, then fill in the key-value pairs of Fields in the template file. The default template file content is as follows:
Field Value Remarks (Optional) temp ${payload.temp} hum ${payload.hum} precip ${payload.precip}i Append an i to the field value to tell InfluxDB to store the number as an integer. - Field: Field key, supports constants or ${var} format placeholders.
- Value: Field value, supports constants or placeholders, can append type identifiers according to the line protocol.
- Remarks: Used only for notes within the CSV file, cannot be imported into EMQX.
Note that the data in the CSV file for batch setting should not exceed 2048 rows.
Save the filled template file and upload it to the Import Batch Setting popup, then click Import to complete the batch setting.
After importing, you can further adjust the key-value pairs of fields in the Fields setting table.
Test the Rule
Use MQTTX to send a message to topic t/1 to trigger an online/offline event.
mqttx pub -i emqx_c -t t/1 -m '{ "msg": "hello InfluxDB" }'Check the running status of the Sink, there should be one new incoming and one new outgoing message.
In the InfluxDB UI, you can confirm whether the message is written into the InfluxDB via the Data Explorer window.
Advanced Configurations
This section delves deeper into the advanced configuration options available for the InfluxDB Connector and Sink. When configuring the Connector and Sink in the Dashboard, navigate to Advanced Settings to tailor the following parameters to meet your specific needs.
| Fields | Descriptions | Recommended Value |
|---|---|---|
| Start Timeout | Determines the maximum time interval, in seconds, that the Connector will wait for an auto-started resource to reach a healthy state before responding to resource creation requests. This setting helps ensure that the Connector does not proceed with operations until it verifies that the connected resource—such as a database instance in InfluxDB—is fully operational and ready to handle data transactions. | 5 |
| Buffer Pool Size | Specifies the number of buffer worker processes that will be allocated for managing data flow in egress-type bridges between EMQX and InfluxDB. These worker processes are responsible for temporarily storing and handling data before it is sent to the target service. This setting is particularly relevant for optimizing performance and ensuring smooth data transmission in egress (outbound) scenarios. For Sinks that only deal with ingress (inbound) data flow, this option can be set to "0" as it is not applicable. | 4 |
| Request TTL | The "Request TTL" (Time To Live) configuration setting specifies the maximum duration, in seconds, that a request is considered valid once it enters the buffer. This timer starts ticking from the moment the request is buffered. If the request stays in the buffer for a period exceeding this TTL setting or if it is sent but does not receive a timely response or acknowledgment from InfluxDB, the request is deemed to have expired. | 45 |
| Health Check Interval | Specifies the time interval, in seconds, at which the Sink will perform automated health checks on the connection to InfluxDB. | 15 |
| Max Buffer Queue Size | Specifies the maximum number of bytes that can be buffered by each buffer worker in the InfluxDB Sink. Buffer workers temporarily store data before it is sent to InfluxDB, serving as an intermediary to handle data flow more efficiently. Adjust the value according to your system's performance and data transfer requirements. | 1 |
| Max Batch Size | Specifies the maximum size of data batches that can be transmitted from EMQX to InfluxDB in a single transfer operation. By adjusting the size, you can fine-tune the efficiency and performance of data transfer between EMQX and InfluxDB. If the "Max Batch Size" is set to 1, data records are sent individually, without being grouped into batches. | 100 |
| Query Mode | Allows you to choose asynchronous or synchronous query modes to optimize message transmission based on different requirements. In asynchronous mode, writing to InfluxDB does not block the MQTT message publish process. However, this might result in clients receiving messages ahead of their arrival in InfluxDB. | Async |
| Inflight Window | An "in-flight query" refers to a query that has been initiated but has not yet received a response or acknowledgment. This setting controls the maximum number of in-flight queries that can exist simultaneously when the Sink is communicating with InfluxDB. When the Query Mode is set to async (asynchronous), the "Inflight Window" parameter gains special importance. If it is crucial for messages from the same MQTT client to be processed in strict order, you should set this value to 1. | 100 |
More Information
Check out the following links to learn more:
Blogs:
Build EMQX + InfluxDB + Grafana IoT data visualization solution in one hour
Integrating MQTT Data into InfluxDB for a Time-Series IoT Application
MQTT Performance Benchmark Testing: EMQX-InfluxDB Integration