MQTT-SN Gateway
MQTT-SN (MQTT for Sensor Networks) is a lightweight pub/sub protocol for wireless sensor networks, the EMQX MQTT-SN Gateway allows these devices to connect and communicate with EMQX, bridging the gap between MQTT-SN and the standard MQTT protocol.
This page introduces how to configure and use the MQTT-SN Gateway in EMQX.
TIP
The MQTT-SN gateway is based on the MQTT-SN v1.2.
Enable the MQTT-SN Gateway
In EMQX 5.0, MQTT-SN gateway can be configured and enabled through the Dashboard, HTTP API, and configuration file emqx.conf. This section takes the configuration via Dashboard as an example to illustrate the operating steps.
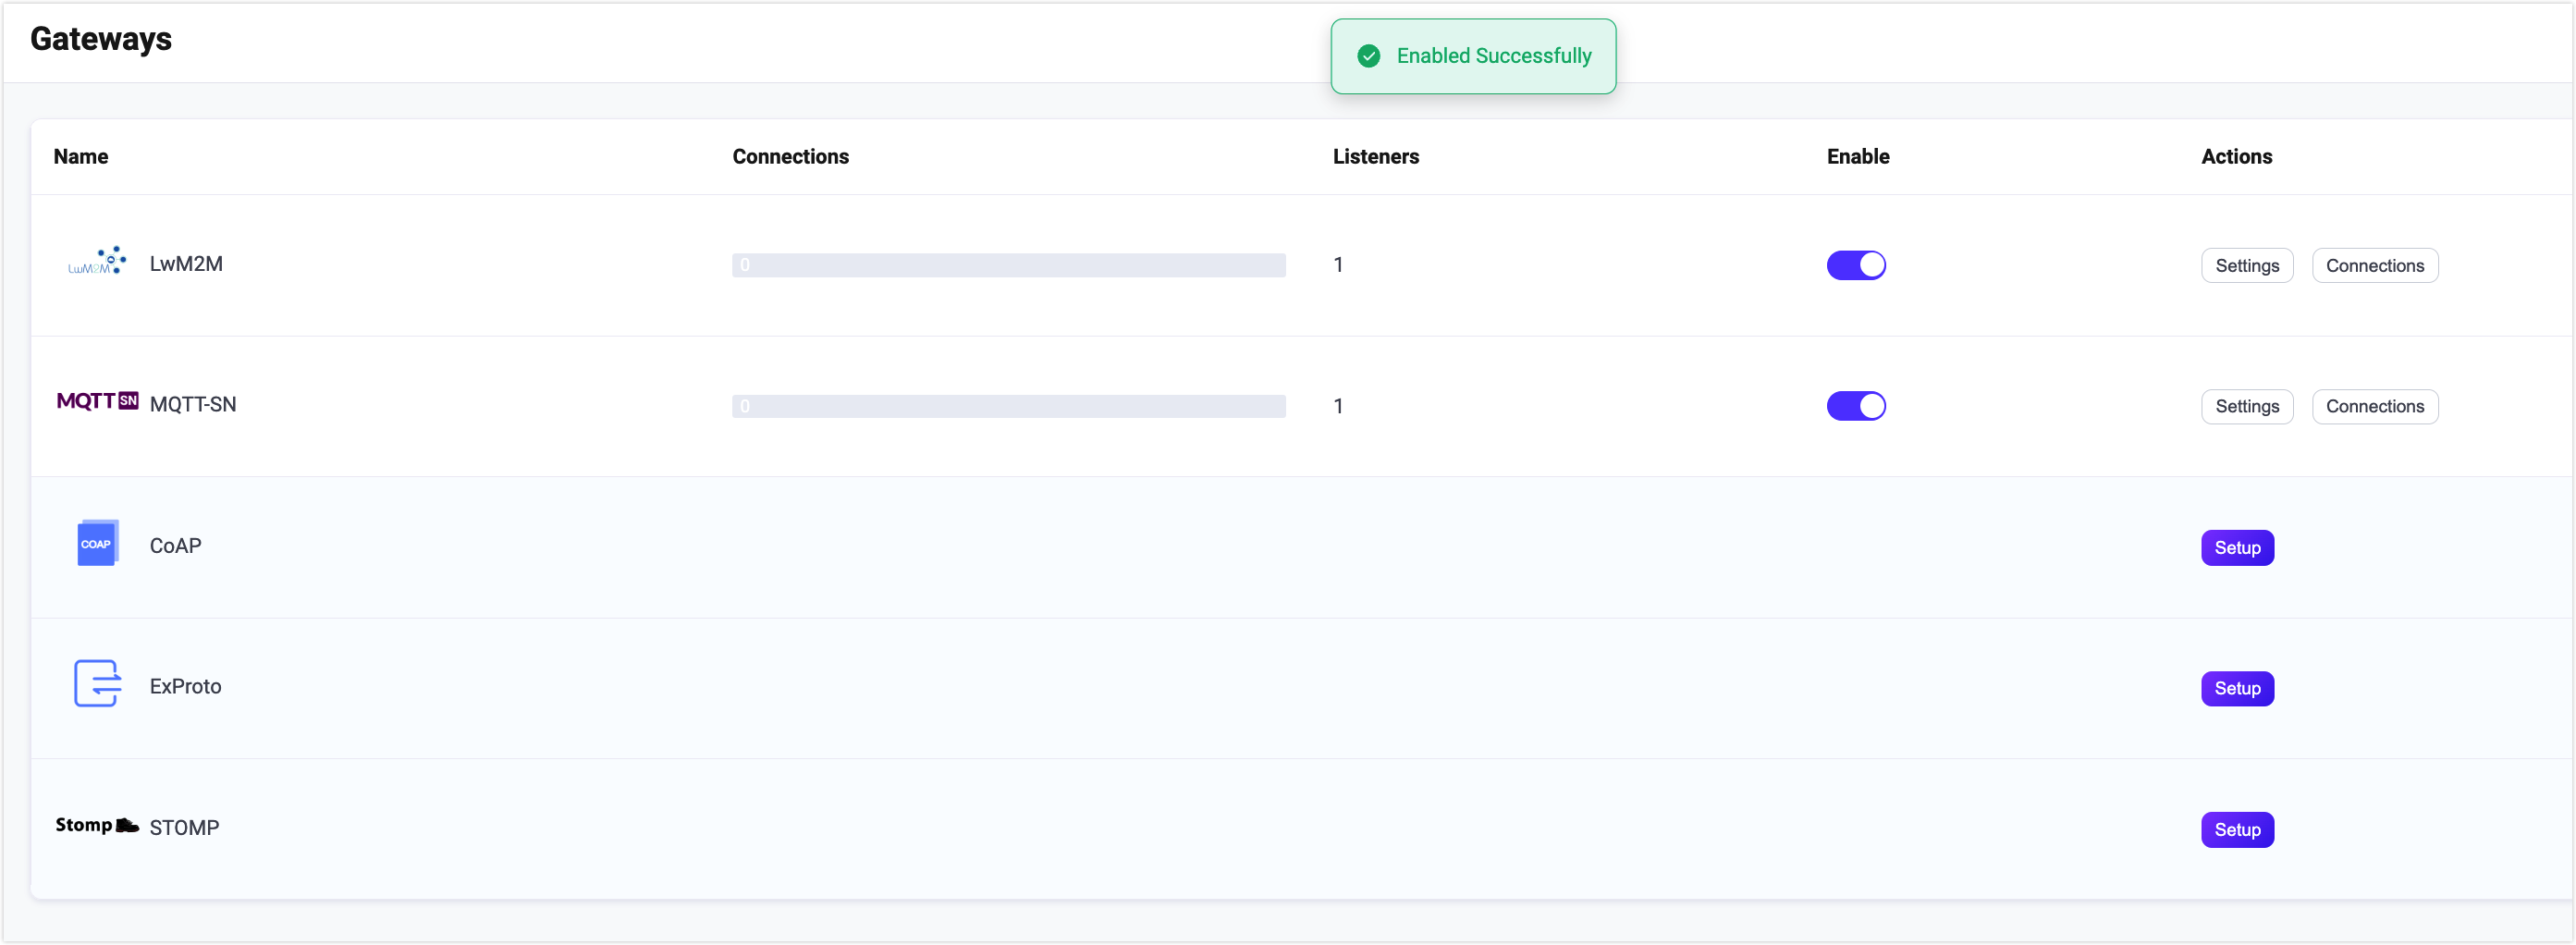
On EMQX Dashboard, click Management -> Gateways on the left navigation menu. On the Gateways page, all supported gateways are listed. Locate MQTT-SN and click Setup in the Actions column. Then, you will be directed to the Initialize MQTT-SN page.
TIP
If you are running EMQX in a cluster, the settings you made through the Dashboard or HTTP API will affect the whole cluster. If you only want to change the settings with one node, configure with emqx.conf.
To simplify the configuration process, EMQX offers default values for all required fields on the Gateways page. If you don't need extensive customization, you can enable the MQTT-SN Gateway in just 3 clicks:
- Click Next in the Basic Configuration tab to accept all the default settings.
- Then you will be directed to the Listeners tab, where EMQX has pre-configured a UDP listener on port 1884. Click Next again to confirm the setting.
- Then click the Enable button to activate the MQTT-SN Gateway.
Upon completing the gateway activation process, you can return to the Gateways page and observe that the MQTT-SN Gateway now displays an Enabled status.
The above configuration can also be configured with HTTP API:
Example Code:
curl -X 'PUT' 'http://127.0.0.1:18083/api/v5/gateways/mqttsn' \
  -u <your-application-key>:<your-security-key> \
  -H 'Content-Type: application/json' \
  -d '{
  "name": "mqttsn",
  "enable": true,
  "gateway_id": 1,
  "mountpoint": "mqttsn/",
  "listeners": [
    {
      "type": "udp",
      "bind": "1884",
      "name": "default",
      "max_conn_rate": 1000,
      "max_connections": 1024000
    }
  ]
}'
For a detailed HTTP API description, see HTTP API - Gateway
If you have some customization needs, want to add more listeners, or add authentication rules, you can continue to read the Customize Your MQTT-SN Gateway section.
Work with MQTT-SN Clients
Client Libraries
After establishing the MQTT-SN gateway, you can use the MQTT-SN client tools to test the connections and ensure everything works as expected. Below are some of the recommended MQTT-SN client tools.
Publish/Subscribe
The MQTT-SN protocol already defines the publish/subscribe behavior, e.g:
- The
PUBLISHmessage of the MQTT-SN protocol is used as a publishing operation, whose topic and QoS are specified by this message. - The
SUBSCRIBEmessage of the MQTT-SN protocol is used as a subscribing operation, whose topic and QoS are both specified by this message. - The
UNSUBSCRIBEmessage of the MQTT-SN protocol is used as an unsubscribe operation, whose topic is specified by this message.
Customize Your MQTT-SN Gateway
In addition to the default settings, EMQX provides a variety of configuration options to better accommodate your specific business requirements. This section offers an in-depth overview of the various fields available on the Gateways page.
Basic Configuration
In the Basic Configuration tab, you can customize your gateway ID, predefine the topic list, and set the MountPoint string for this gateway. See the texts below the screenshot for a comprehensive explanation of each field.
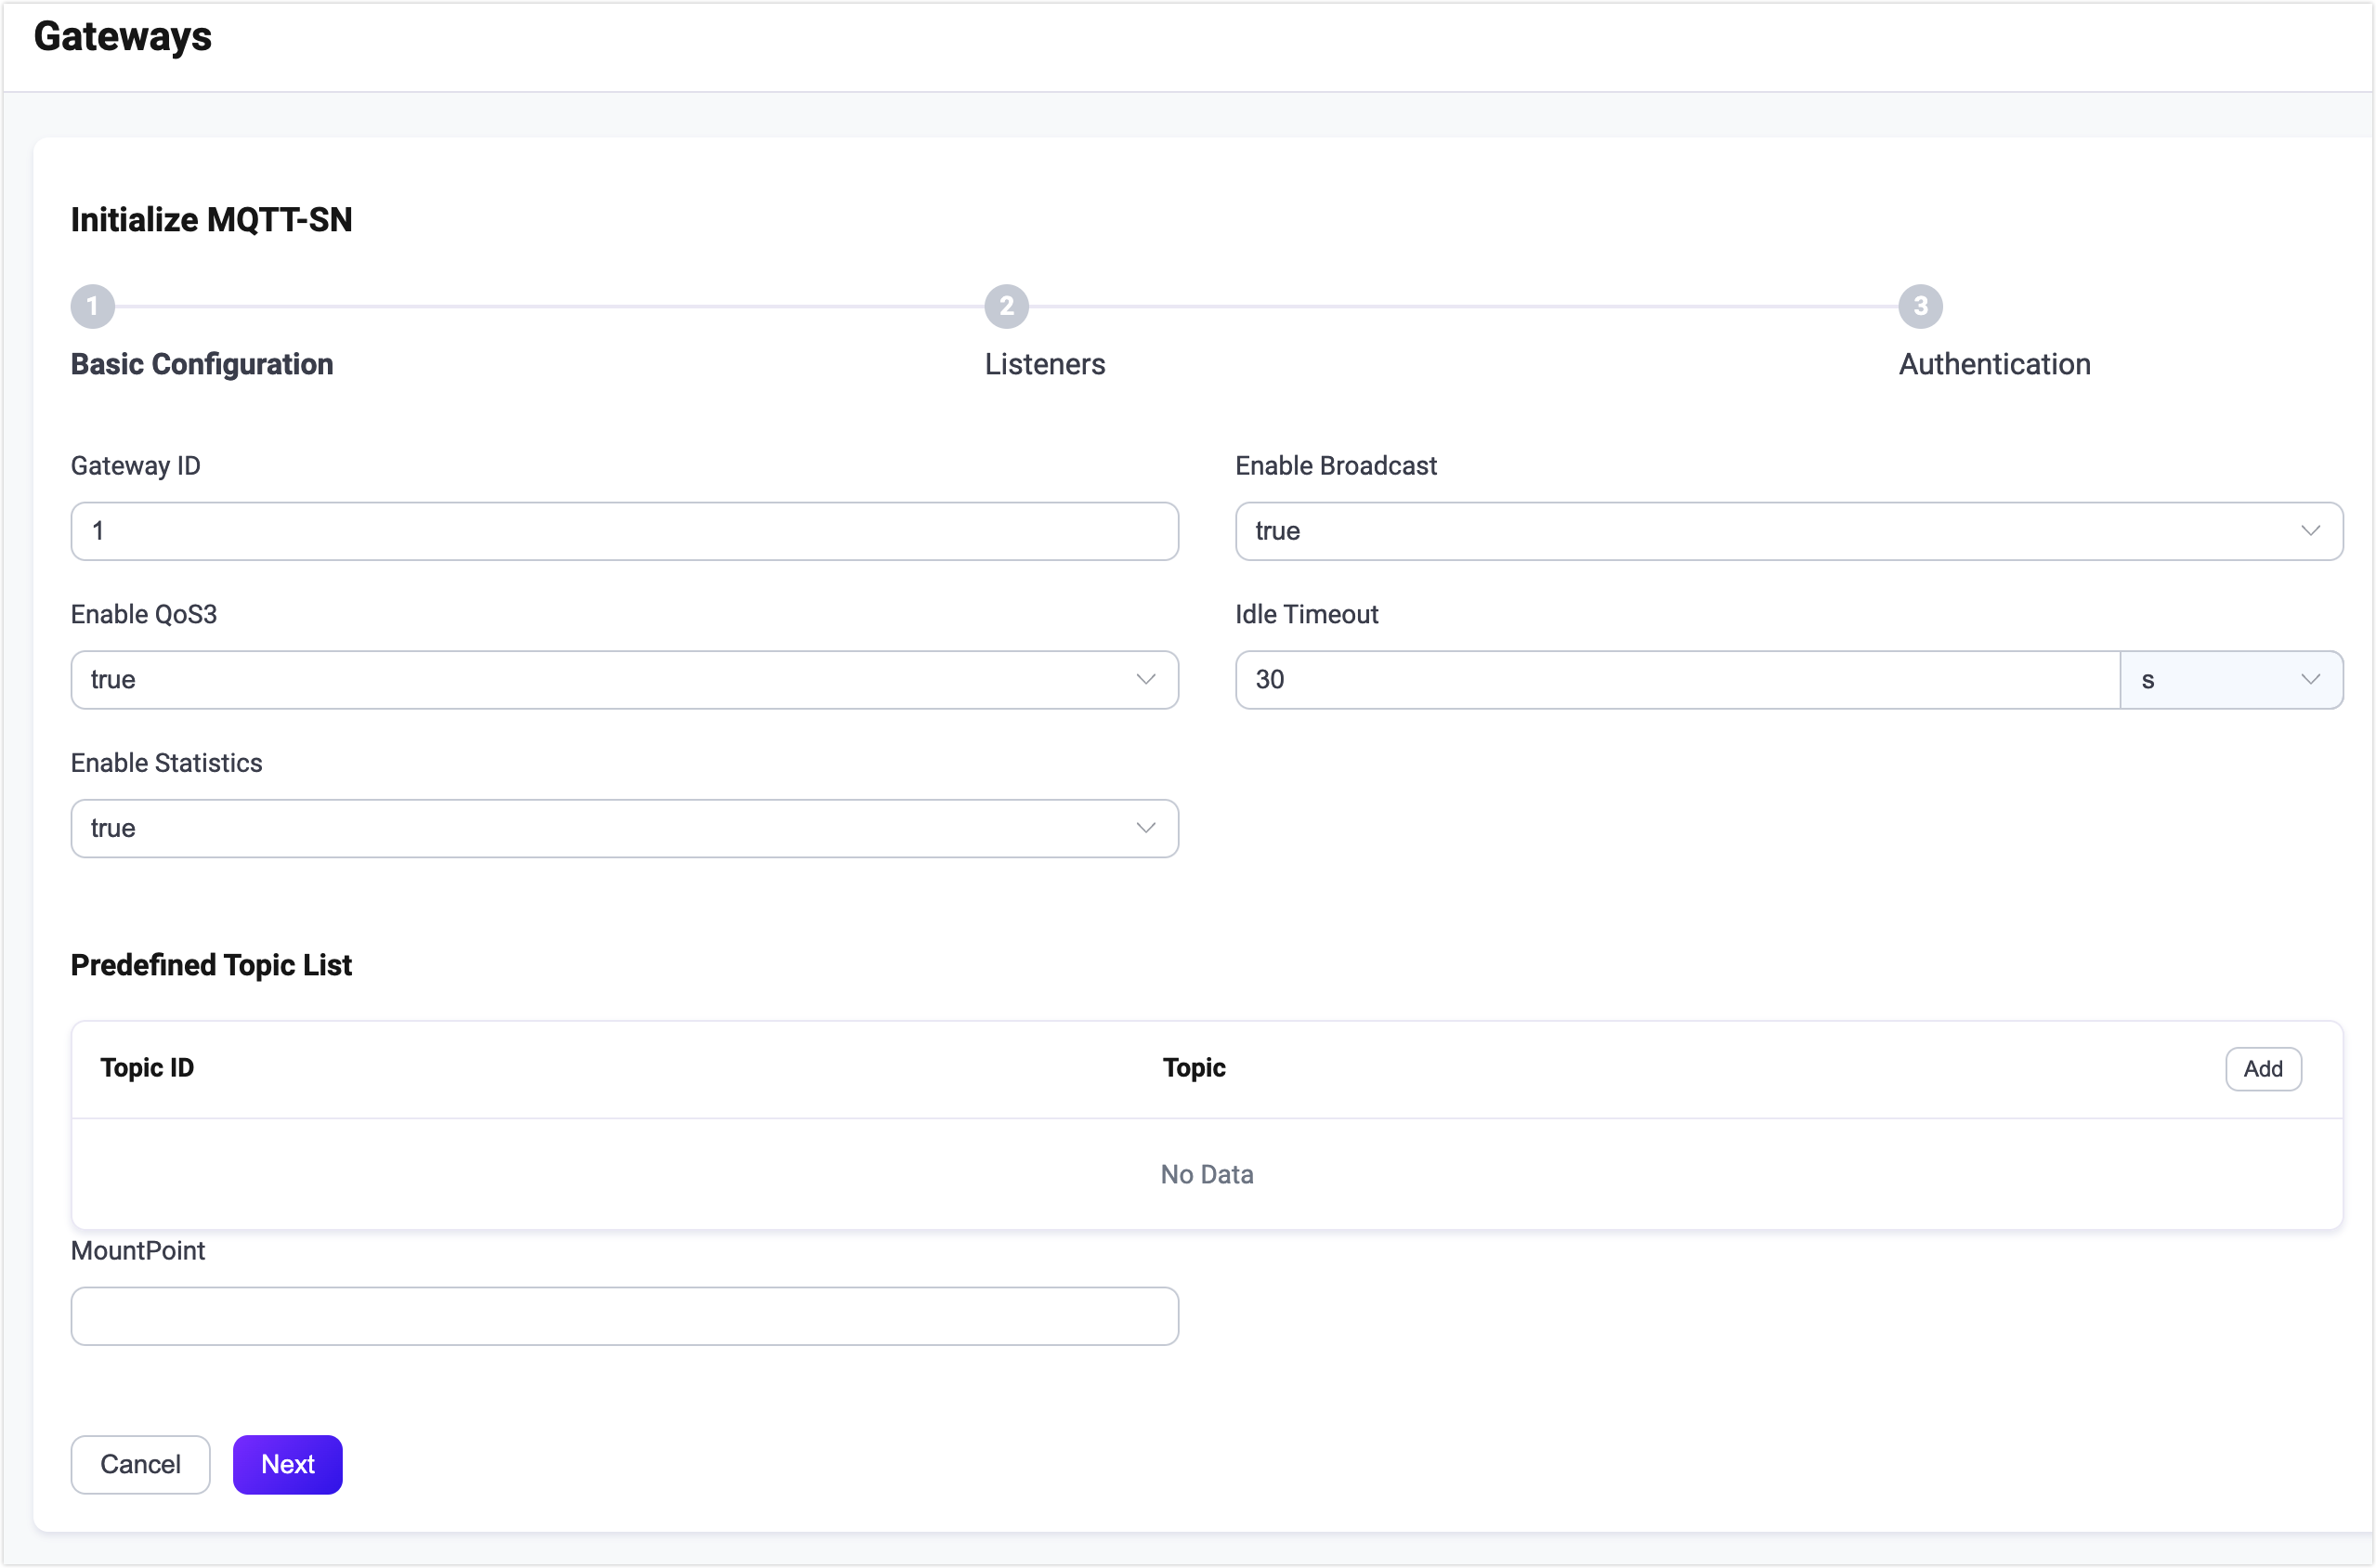
Gateway ID: Set the unique identifier of the gateway, for example, 1.
Enable Broadcast: Set whether to allow the gateway to broadcast gateway advertisements to clients, it will broadcast the message the Gateway ID you just specified, default:
true, optional values:true,false.Enable QoS3: Set whether to allow the gateway to support QoS 3 (Exactly-once) message delivery, this setting is intended for basic clients that only need to send
PUBLISHmessages to the gateway; default:true, optional values:true,false.Idle Timeout: Set the duration (in seconds) of inactivity after which a connected MQTT-SN client will be considered disconnected. Default:
30s.Enable Statistics: Set whether to allow the Gateway to collect and report statistics; default:
true, optional values:true,false.Predefined Topic List: Set the predefined topic IDs and corresponding topic names. Click Add to add a new entry.
- Topic ID: Set the topic ID, which should be an integer between 1 and 65535.
- Topic: Set the topic names.
MountPoint: Set a string that is prefixed to all topics when publishing or subscribing, providing a way to implement message routing isolation between different protocols, for example,
mqttsn/.Note: This topic prefix is managed by the gateway. MQTT-SN clients do not need to add this prefix explicitly when publishing and subscribing.
Add Listeners
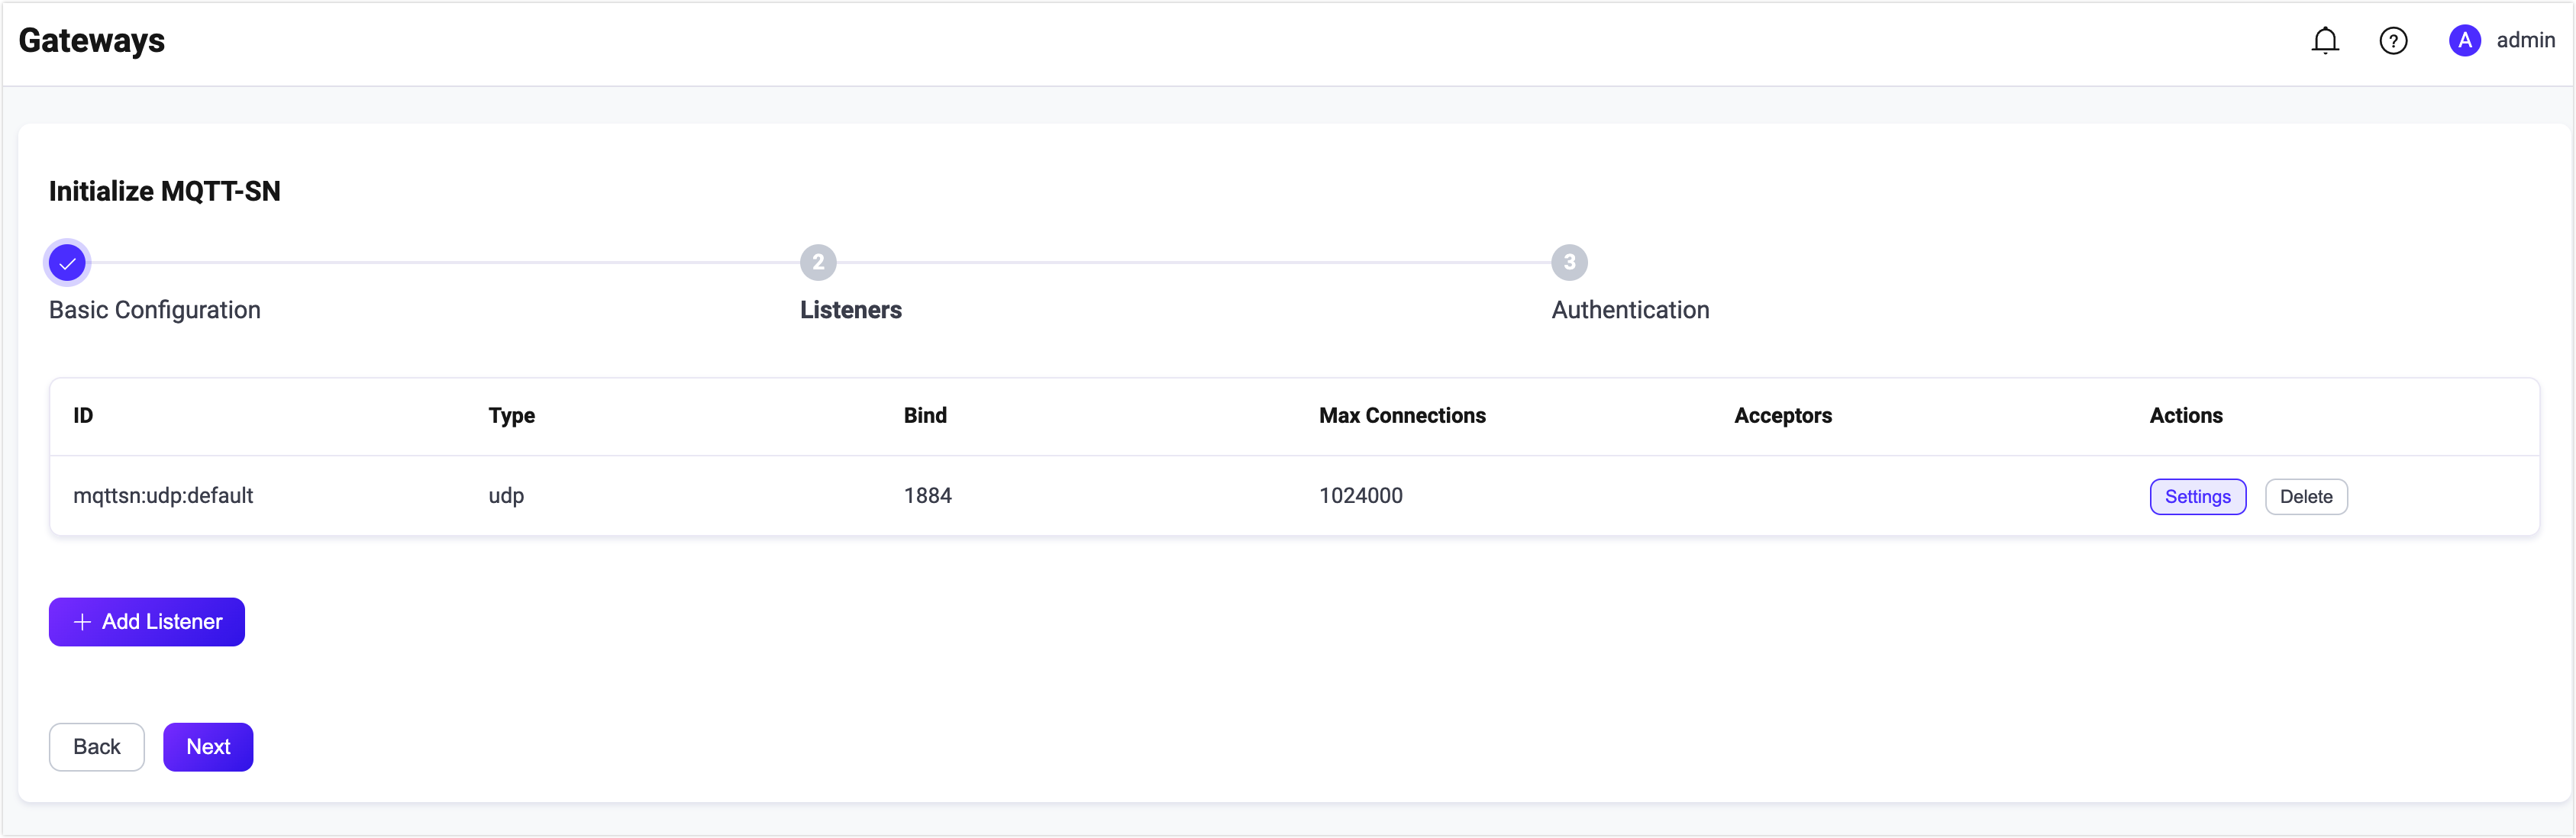
By default, one UDP listener with the name of default is already configured on port 1884, which allows a maximum of 1,000 connections per second, and support up to 1,024,000 concurrent connections. You can click Settings for more customized settings, click Delete to delete the listener, or click + Add Listener to add a new listener.
Click Add Listener to open Add Listener page, where you can continue with the following configuration fields:
Basic settings
- Name: Set a unique identifier for the listener.
- Type: Select the protocol type, for MQTT-SN, this can be either udp or dtls.
- Bind: Set the port number on which the listener accepts incoming connections.
- MountPoint (optional): Set a string that is prefixed to all topics when publishing or subscribing, providing a way to implement message routing isolation between different protocols
Listener Settings
- **Acceptor **(for DTLS listeners only): Set the size of the acceptor pool, default: 16.
- Max Connections: Set the maximum number of concurrent connections that the listener can handle, default: 1024000.
- Max Connection Rate: Set the maximum rate of new connections the listener can accept per second, default: 1000.
UDP Settings
- ActiveN: Set the
{active, N}option for the socket, that is, the number of incoming packets the socket can actively process. For details, see Erlang Documentation - setopts/2. - Buffer: Set the size of the buffer used to store incoming and outgoing packets, unit: KB.
- Receive Buffer: Set the size of the receive buffer, unit: KB.
- Send Buffer: Set the size of the send buffer, unit: KB.
- SO_REUSEADDR: Set whether to allow local reuse of port numbers.
DTLS Settings (for DTLS listeners only)
You can set whether to enable the TLS Verify by setting the toggle switch. But before that, you need to configure the related TLS Cert, TLS Key, and CA Cert information, either by entering the content of the file or uploading with the Select File button. For details, see Enable SSL/TLS Connection.
Then you can continue to set:
- DTLS Versions: Set the DTLS versions supported, default, dtlsv1.2 and dtlsv1.
- Fail If No Peer Cert: Set whether EMQX will reject the connection if the client sends an empty certificate, default: false, optional values: true, false.
- Intermediate Certificate Depth: Set the maximum number of non-self-issued intermediate certificates that can be included in a valid certification path following the peer certificate, default, 10.
- Key Password: Set the user's password, used only when the private key is password-protected.
Configure Authentication
Since the connection message of the MQTT-SN protocol only gives the Client ID of the Client, therefore, the MQTT-SN gateway only supports HTTP Server Authentication.
The client information generation rules are as follows:
- Client ID: using the Client ID field of
CONNECTmessage. - Username: undefined
- Password: undefined
This part takes the Dashboard as an example to illustrate how to do the authentication configuration.
On the Gateways page, locate MQTT-SN and click Setup in the Actions column and click Authentication to enter the Authentication tab.
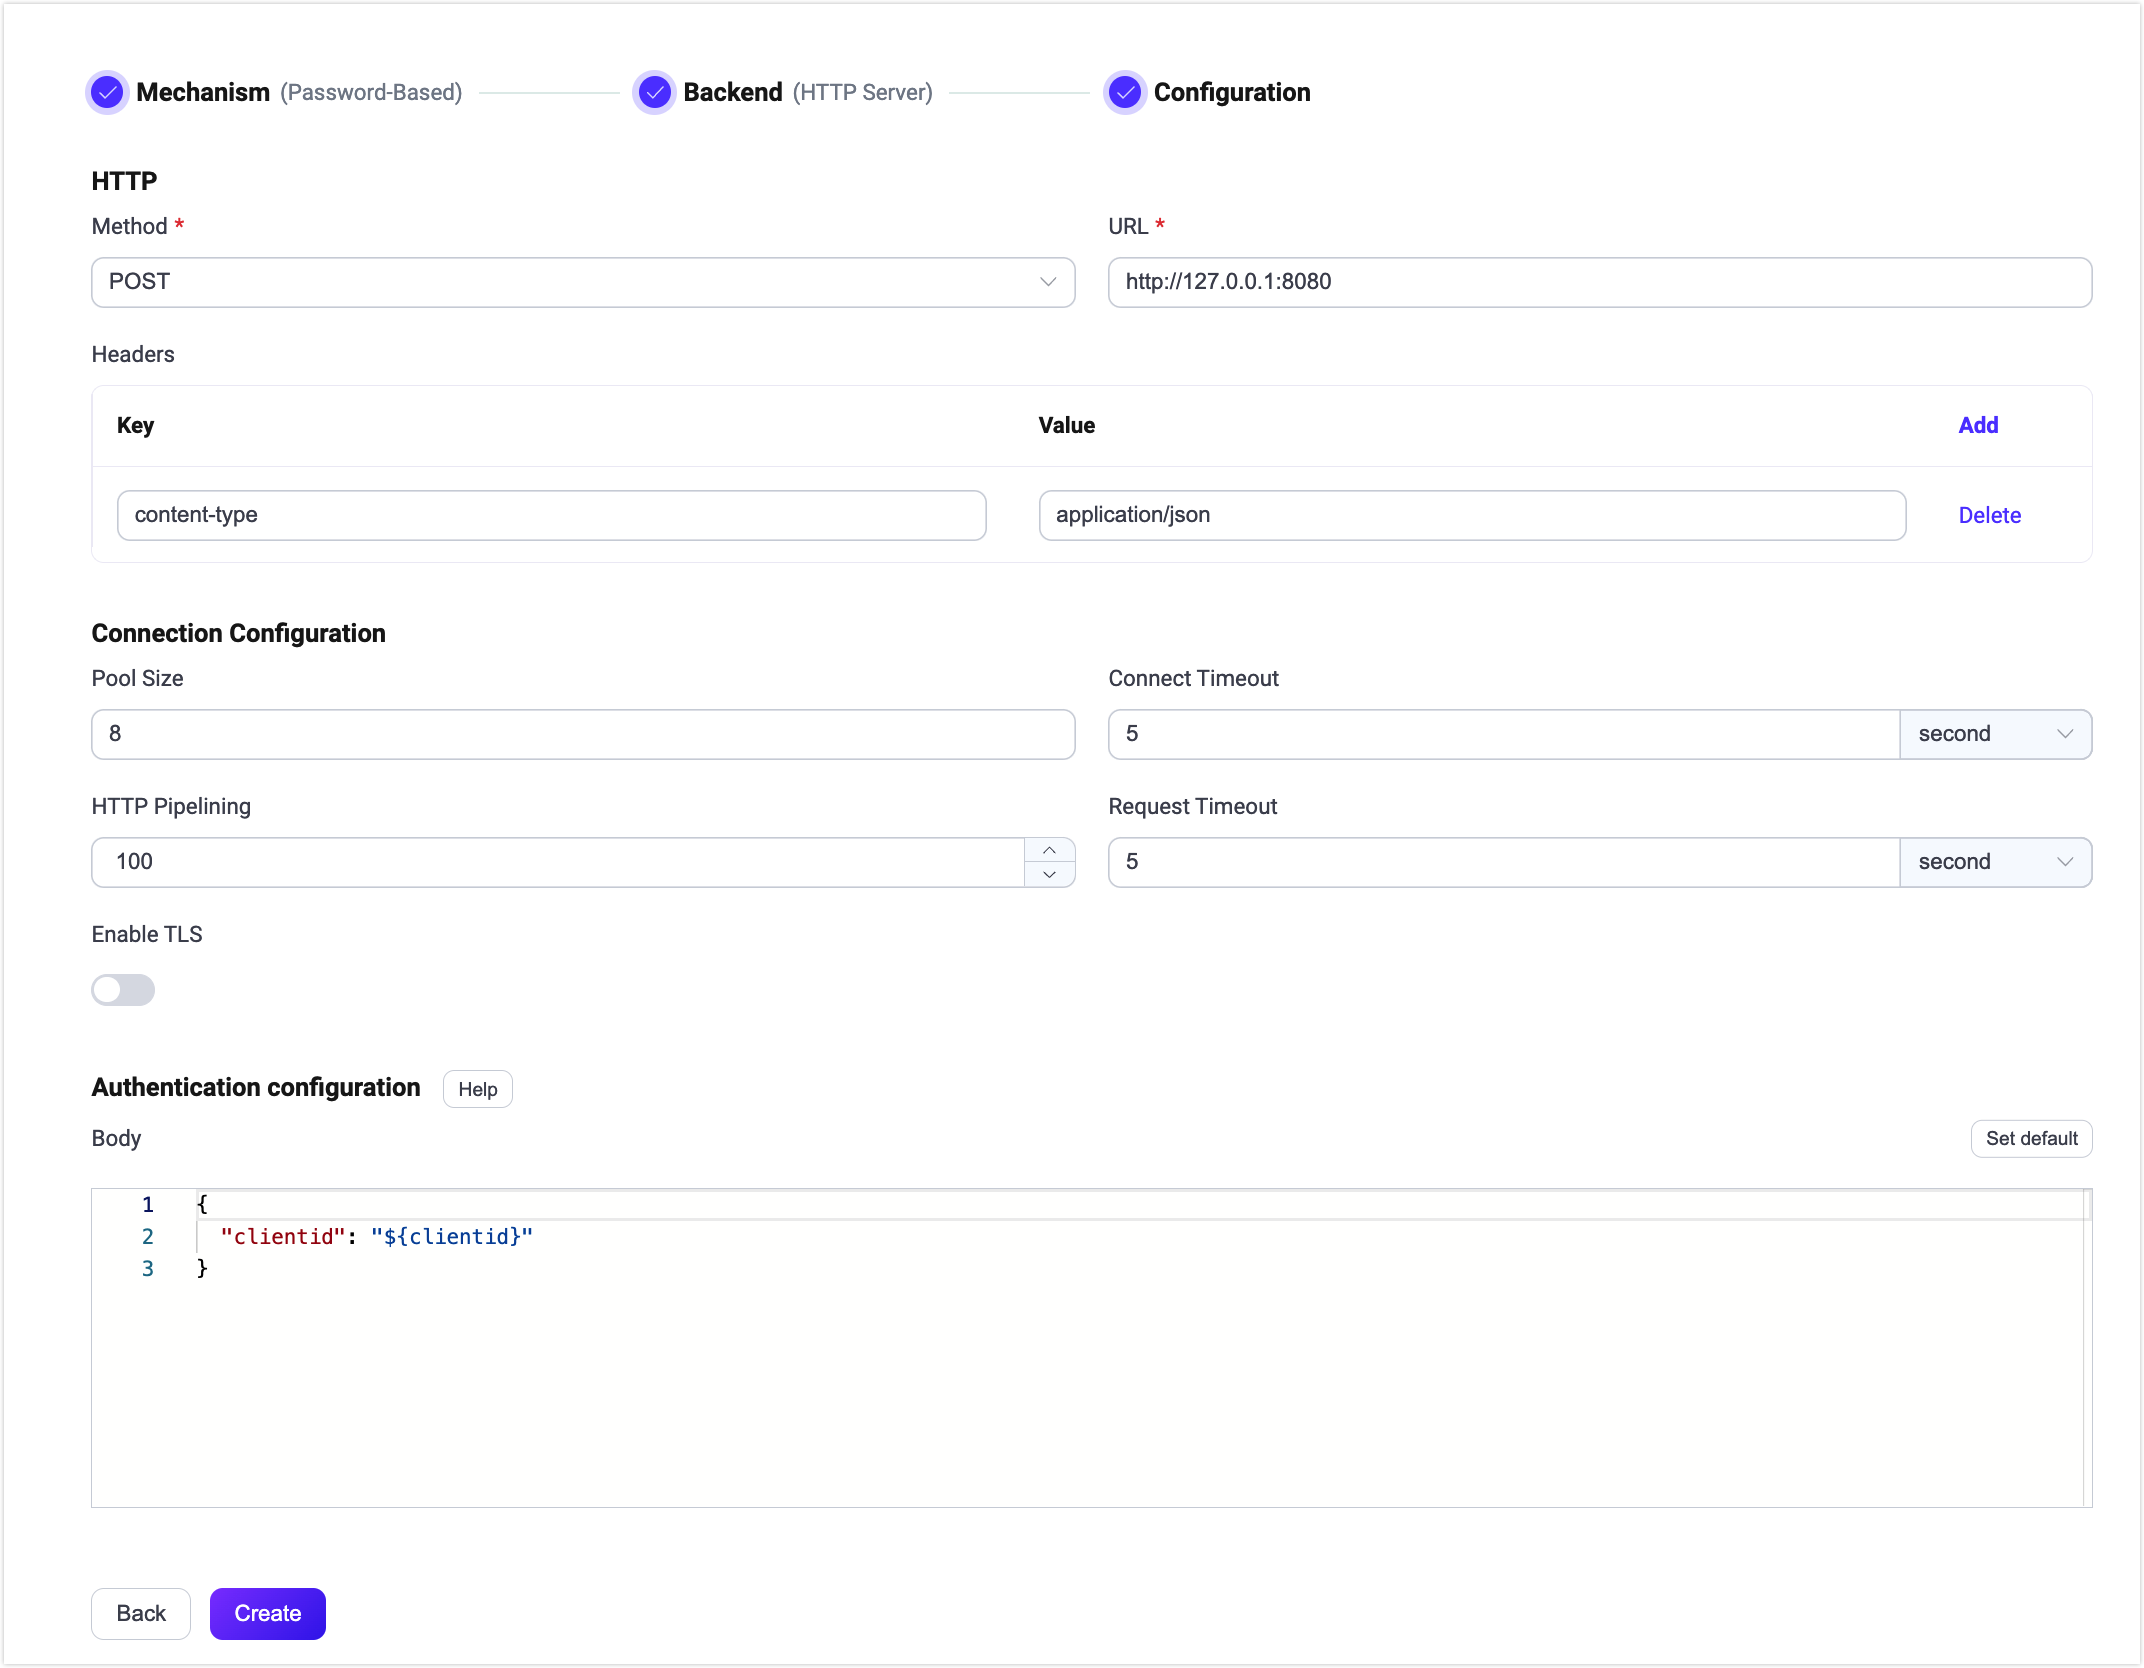
Click Create Authentication, choose Password-Based as the Mechanism, and select HTTP Server as the Backend. Then in the Configuration tab, you can set the authentication rules.
For a detailed explanation of each field on the page, you can refer to HTTP Server Authentication.
The above configuration can also be performed via HTTP API.
Example Code
curl -X 'POST' 'http://127.0.0.1:18083/api/v5/gateway/mqttsn/authentication' \
  -u <your-application-key>:<your-security-key> \
  -H 'Content-Type: application/json' \
  -d '{
  "method": "post",
  "url": "http://127.0.0.1:8080",
  "headers": {
    "content-type": "application/json"
  },
  "body": {
    "clientid": "${clientid}"
  },
  "pool_size": 8,
  "connect_timeout": "5s",
  "request_timeout": "5s",
  "enable_pipelining": 100,
  "ssl": {
    "enable": false,
    "verify": "verify_none"
  },
  "backend": "http",
  "mechanism": "password_based",
  "enable": true
}'