Ingest MQTT Data into HTTP Server
The HTTP server data integration provides a quick way to integrate EMQX with external HTTP services. It supports flexible configuration of request methods and request data formats, offers secure communication through HTTPS, and provides authentication mechanisms. It can efficiently and flexibly transmit client messages and event data in real-time, enabling scenarios such as IoT device state notifications, alert notifications, and data integration.
This page provides a detailed overview of the features and capabilities of the data integration with HTTP server and offers practical guidance on setting up an HTTP server data integration.
TIP
For users who need to integrate with HTTP services but do not require data processing using rules, we recommend using Webhook as it is simpler and easier to use.
How It Works
HTTP server data integration is an out-of-the-box feature in EMQX, allowing integration with external HTTP services through simple configuration. With the HTTP service, users can write code in their preferred programming language and framework to implement custom, flexible, and complex data processing logic.
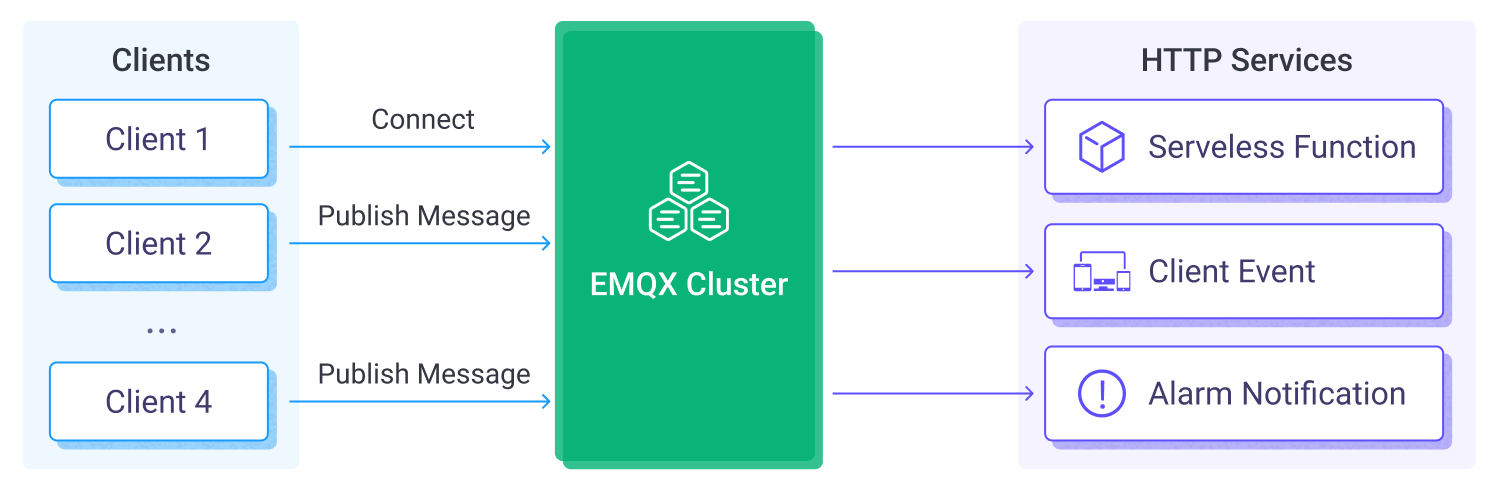
EMQX forwards device events and data to the HTTP server through the rule engine and Sink. The workflow is as follows:
- Devices Connect to EMQX: When IoT devices successfully connect, an online event is triggered, containing device ID, source IP address, and other attributes.
- Devices Publish Messages: Devices publish telemetry and status data through specific topics, triggering the rule engine.
- Rule Engine Processes Messages: Using the built-in rule engine, MQTT messages and events from specific sources are processed based on topic matching. The rule engine matches corresponding rules and processes messages and events, such as converting data formats, filtering specific information, or enriching messages with context information.
- Bridging to HTTP Server: The configured rule triggers the action of forwarding the processed messages and events to the HTTP server. Users can extract data from rule processing results and dynamically construct request headers, request bodies, or even URLs, allowing flexible integration of data with external services.
After events and message data are sent to the HTTP server, you can perform flexible processing, such as:
- Implementing device status updates and event logging for developing device management systems based on data.
- Writing message data to a database to achieve lightweight data storage functionality.
- For abnormal data filtered by SQL rules, you can directly use the HTTP service to trigger alert notification systems for device anomaly monitoring.
Features and Benefits
Using EMQX's HTTP server integration can bring the following advantages to your business:
- Extend Data Delivery to More Downstream Systems: The HTTP service enables seamless integration of MQTT data with various external systems, such as analytics platforms and cloud services, facilitating data distribution across multiple systems.
- Real-time Responses and Business Process Triggering: Through the HTTP service, external systems can receive MQTT data in real-time and trigger business processes, ensuring quick responses. For example, receiving alert data and triggering business workflows.
- Custom Data Processing: External systems can perform secondary processing on received data as per their needs, allowing for more complex business logic that is not limited by EMQX's capabilities.
- Loosely Coupled Integration: The HTTP service uses a simple HTTP interface, providing a loosely coupled approach to system integration.
In summary, the HTTP service offers real-time, flexible, and customizable data integration capabilities for your business, catering to flexible and diverse application development needs.
Before You Start
This section describes the preparations you need to complete before you start to create the HTTP server data integration, including setting up a simple HTTP server.
Prerequisites
Knowledge about EMQX data integration rules
Knowledge about Data Integration
Set up a Simple HTTP Server
- Use Python to build a simple HTTP service. This HTTP service will receive the
POST /requests and will return200 OKafter printing the requested content:
from flask import Flask, json, request

api = Flask(__name__)

@api.route('/', methods=['POST'])
def print_messages():
  reply= {"result": "ok", "message": "success"}
  print("got post request: ", request.get_data())
  return json.dumps(reply), 200

if __name__ == '__main__':
api.run()- Save the above code as
http_server.pyfile. Then start the server by running:
pip install flask

python3 http_server.py
Create a Connector
This section demonstrates how to configure an HTTP server Connector that is used to connect the Sink to the HTTP server.
Go to EMQX Dashboard, and click Integration -> Connector.
Click Create on the top right corner of the page. Click to select the HTTP Server and click Next:
Enter a name for the Connector. The name should be a combination of upper/lower case letters or numbers, for example,
my_httpserver.Set URL to
http://localhost:5000. For the rest, you can keep the default value.Advanced settings (optional): For details, see Features of Sink.
Before clicking Create, you can click Test Connectivity to test that the Connector can connect to the HTTP server.
Click Create to complete the creation of the Connector.
Now you have created an HTTP Server Connector. Next, you need to create a rule and Sink to specify the data to be written into the HTTP Server.
Create a Rule with HTTP Server Sink
This section demonstrates how to create a rule with an HTTP Server Sink added to the rule.
Go to EMQX Dashboard, and click Integration -> Rules.
Click Create on the top right corner of the page.
Enter
my_ruleas the rule ID, and set the rules in the SQL Editor.Enter the following statement in the SQL Editor as an example, which means the MQTT messages under topic
t/#will be saved to the HTTP server.Note: If you want to specify your own SQL syntax, make sure that you have included all fields required by the Sink in the
SELECTpart.bashSELECT * FROM "t/#"Click the + Add Action button to define an action to be triggered by the rule. Select
HTTP Serverfrom the Type of Action dropdown list so that EMQX will send the data processed by the rule to the HTTP Server.Keep the Action dropdown box with the value
Create Action. Or, you also can select an HTTP Server action previously created. In this demonstration, you create a new Sink and add it to the rule.Enter the name and description for the Sink in the Name and Description text boxes.
Select the
my-httpserveryou just created from the Connector dropdown box. You can also create a new Connector by clicking the button next to the dropdown box. For the configuration parameters, see Create a Connector.Set URL to
http://localhost:5000. SelectPOSTfrom the Method dropdown box. For the rest, you can keep the default value.Click the Create button to complete the Sink configuration. Back on the Create Rule page, you will see the new Sink appear under the Action Outputs tab.
On the Create Rule page, verify the configured information and click the Create button to generate the rule.
Now you have successfully created the rule and you can see the new rule appear on the Rule page. Click the Actions(Sink) tab, you can see the new HTTP Server Sink.
You can also click Integration -> Flow Designer to view the topology. It can be seen that the messages under topic t/# are sent and saved to the HTTP Server after parsing by the rule my_rule.
Test the Rule
Use MQTTX to send a message to topic t/1 to trigger an online/offline event.
mqttx pub -i emqx_c -t t/1 -m '{ "msg": "hello HTTP Server" }'Click the name of the rule on the Rule page to view the statistics. Check the running status of the Sink and there should be one new incoming and one new outgoing message.
Verify whether the message has been sent to the HTTP server:
python3 http_server.py
 * Serving Flask app 'http_server' (lazy loading)
 * Environment: production
   WARNING: This is a development server. Do not use it in a production deployment.
   Use a production WSGI server instead.
 * Debug mode: off
 * Running on http://127.0.0.1:5000 (Press CTRL+C to quit)

got post request:  b'hello HTTP Server'