Bridge with Other MQTT Services
MQTT Broker data integration provides EMQX with functionality to connect to another EMQX cluster or another MQTT service for message bridge, enabling cross-network, cross-service data interaction and communication. This page introduces the working principle of the MQTT message bridge in EMQX and offers practical guidance on creating and verifying message bridges.
How It Works
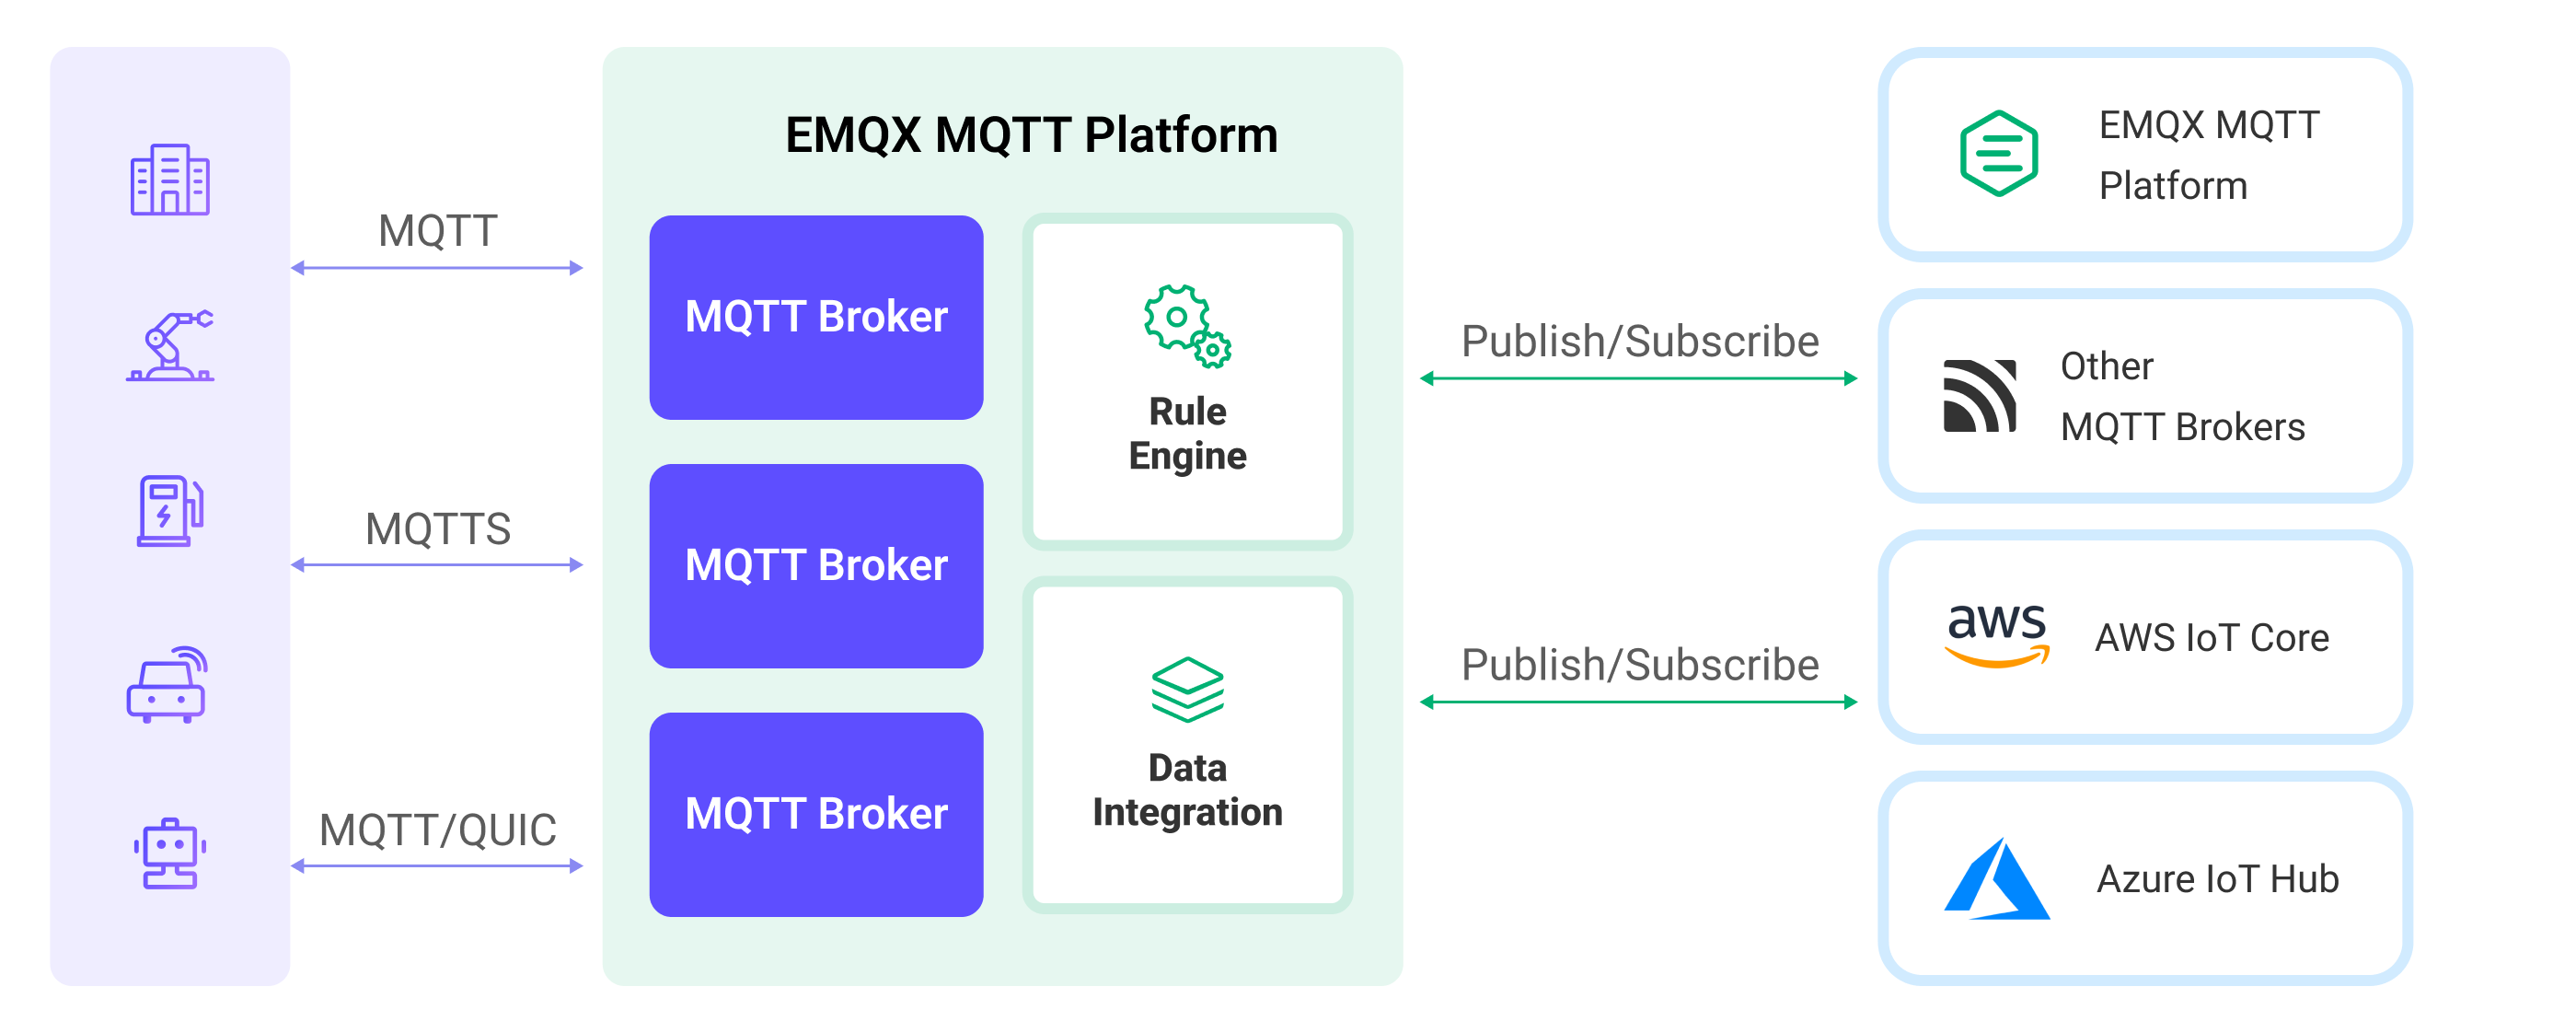
During bridging, EMQX establishes an MQTT connection with the target service as a client, achieving bidirectional message transmission through the publish-subscribe model:
- Outgoing Messages (Sink): Publishes messages from local topics to specified topics on the remote MQTT service.
- Incoming Messages (Source): Subscribes to topics on the remote MQTT service and forwards their messages to EMQX locally.
EMQX supports configuring multiple bridging rules on the same connection, each with different topic mappings and message transformation rules, implementing a function similar to message routing. During bridging, you can also process messages through the Rule Engine to filter, enrich, and transform messages before forwarding.
The diagram below shows a typical architecture of data integration between EMQX and other MQTT services:
Features and Benefits
The MQTT Broker data integration has the following features and benefits:
- Extensive Compatibility: It uses the standard MQTT protocol, allowing it to bridge to various IoT platforms, including AWS IoT Core, Azure IoT Hubs, and also supports open-source or other industry MQTT brokers and IoT platforms. This enables seamless integration and communication with a variety of devices and platforms.
- Bidirectional Data Flow: It supports bidirectional data flow, enabling the publishing of messages from EMQX locally to remote MQTT services, and also subscribing to messages from MQTT services and publishing them locally. This bidirectional communication capability makes data transfer between different systems more flexible and controllable.
- Flexible Topic Mapping: Based on the MQTT publish-subscribe model, the MQTT broker data integration implements flexible topic mapping. It supports adding prefixes to topics and dynamically constructing topics using the client's contextual information (such as client ID, username, etc.). This flexibility allows for customized processing and routing of messages according to specific needs.
- High Performance: It offers performance optimization options like connection pooling and shared subscriptions to reduce the load on individual bridging clients, achieving lower bridging latency and higher message throughput. These optimization measures enhance the overall system performance and scalability.
- Payload Transformation: It allows for the processing of message payloads by defining SQL rules. This means that during message transmission, operations such as data extraction, filtering, enrichment, and transformation can be performed on the payload. For example, real-time metrics can be extracted from the payload and transformed and processed before the message is delivered to the remote MQTT Broker.
- Metrics Monitoring: The runtime metrics monitoring is provided for each Sink/Source. It allows viewing of total message count, success/failure counts, current rates, etc., helping users to monitor and assess the performance and health of the Sink/Source in real-time.
Prepare MQTT Connection Information
Before creating an MQTT Broker data integration, you need to obtain the connection information for the remote MQTT service, including:
- MQTT Service Address: The address and port of the target MQTT service, for example,
broker.emqx.io:1883. - Username: The username required for the connection. If the target service does not require authentication, this can be left blank.
- Password: The password required for the connection. If the target service does not require authentication, this can also be left blank.
- Protocol Type: It is important to determine whether the target service has enabled TLS and whether it is using MQTT over TCP/TLS protocol. Note that the EMQX MQTT bridge currently does not support protocols like MQTT over WebSocket and MQTT over QUIC.
- Protocol Version: The protocol version used by the target MQTT service. EMQX supports MQTT 3.1, 3.1.1, and MQTT 5.0.
The data integration provides good compatibility and support for EMQX or other standard MQTT servers. If you need to connect to other types of MQTT services, you can refer to their relevant documentation to obtain the connection information. Generally, most IoT platforms provide standard MQTT access methods, and you can convert device information into the aforementioned MQTT connection information based on their guidance.
Note
When EMQX is running in cluster mode or when a connection pool is enabled, using the same client ID to connect multiple nodes to the same MQTT service usually leads to device conflicts. Therefore, the MQTT message bridge currently does not support setting a fixed client ID.
Create a Connector
This section guides you on how to configure a connection with a remote MQTT server, using EMQX's online MQTT server as an example.
- Go to the Integration -> Connector page on the Dashboard.
- Click Create at the top right corner of the page.
- Select MQTT Broker from the list of connector types and click Next.
- Enter a name for the connector, which must be a combination of upper/lower case letters and numbers, for example,
my_mqtt_bridge. - Configure the connection information:
- MQTT Broker: Only supports MQTT over TCP/TLS. Set this to
broker.emqx.io:1883. - ClientID Prefix: This can be left blank. In actual use, specifying a client ID prefix can facilitate client management. EMQX will automatically generate client IDs based on the client ID prefix and the size of the connection pool.
- Username and Password: These can be left blank, as authentication is not required for this server.
- MQTT Broker: Only supports MQTT over TCP/TLS. Set this to
Leave the other configurations as default and click the Create button to complete the creation of the Connector. The Connector can be used for both Sink and Source. Next, you can create data bridge rules based on this Connector.
Connection Pool and Client ID Generation Rules
EMQX enables multiple clients to simultaneously connect to the bridged MQTT service. When creating a Connector, you can set up an MQTT client connection pool and configure its size to indicate the number of client connections in the pool. The connection pool maximizes server resources for greater message throughput and better concurrent performance, which is crucial for handling high-load, high-concurrency scenarios.
As the MQTT protocol requires clients connected to an MQTT server to have a unique client ID, and since EMQX can be deployed in a cluster, each client in MQTT bridging is assigned a unique client ID. EMQX automatically generates client IDs according to the following pattern:
[Client ID Prefix]:{Connector Name}{8-digit Random String}:{Connection Sequence Number in the Pool}For example, if the client ID prefix is myprefix and the Connector name is foo, an actual client ID might be:
myprefix:foo2bd61c44:1Create a Rule with MQTT Broker Sink
This section demonstrates how to create a rule for specifying data to be forwarded to a remote MQTT service.
Go to the Dashboard Integration -> Rules page.
Click Create at the top right of the page.
Enter the rule ID
my_rule.In the SQL Editor, enter the rule to store MQTT messages from the
t/#topic to the remote MQTT server. The rule SQL is as follows:sqlSELECT * FROM "t/#"Add an action by selecting
MQTT Brokerfrom the Action Type dropdown list. Keep the Action dropdown as the defaultCreate Actionoption. This demonstration creates a new Sink and adds it to the rule.Enter the name and description for the Sink in the form below.
Select the
my_mqtt_bridgeconnector you just created from the Connector dropdown. You can also create a new connector by clicking the create button next to the dropdown, using the configuration parameters in Create a Connector.Configure the Sink information for publishing messages from EMQX to the external MQTT service:
- Topic: The topic to publish to the external MQTT service, supporting
${var}placeholders. Enterpub/${topic}here, meaning the original topic will be prefixed withpub/for forwarding. For example, if the original message topic ist/1, the topic forwarded to the external MQTT service will bepub/t/1. - QoS: The QoS for message publishing. Select from the dropdown options:
0,1,2, or${qos}, or enter a placeholder to set QoS from another field. Here, select${qos}to follow the QoS of the original message. - Retain: Select
true,false, or${falgs.retain}to decide whether to publish the message as retained, or enter a placeholder to set the retain flag from other fields. Here, select${falgs.retain}to follow the retain flag of the original message. - Payload: The template used to generate the payload for the forwarded message. Leave blank by default, which means forwarding the rule output result. Here, you can enter
${payload}to forward only the payload.
- Topic: The topic to publish to the external MQTT service, supporting
Use default values for other configurations and click the Create button to complete the creation of the Sink. Once created, you will be directed back to the Create Rule page, and the new Sink will be added to the Action Outputs of the rule.
On the Create Rule page, click the Create button at the bottom to complete the rule creation.
You have now successfully created the rule. You can see the newly created rule on the Integration -> Rules page. Click the Actions(Sink) tab and you can see the new MQTT Broker Sink.
You can also click Integration -> Flow Designer to view the topology. The topology visually represents how messages under the topic t/# are sent to the remote MQTT Broker after being processed by the rule my_rule.
Test the Rule with MQTT Broker Sink
You can use the MQTTX CLI to test the Rule for bridging messages published from the t/# topic in EMQX to the pub/${topic} topic in the external MQTT service. By publishing a message to t/1 topic in EMQX, the message should be forwarded to the pub/t/1 topic in the external MQTT service.
Subscribe to the
pub/#topic in the external MQTT Service:bashmqttx sub -t pub/# -q 1 -h broker.emqx.io -vPublish a message to the
t/1topic using MQTTX:bashmqttx pub -t t/1 -m "hello world" -rYou can subscribe to the
pub/t/1topic in MQTTX to receive the message, indicating that the message has been successfully forwarded from EMQX to the external MQTT service:bash[2024-1-31] [16:43:13] › topic: pub/t/1 payload: hello worldRepeat Step 1, and you should see the retained message from the
pub/t/1topic in MQTTX:bash[2024-1-31] [16:44:29] › topic: pub/t/1 payload: hello world retain: true
Create a Rule with MQTT Broker Source
This section demonstrates how to create a rule for forwarding data from a remote MQTT service to the local EMQX. You need to create an MQTT Source and a message republish action to achieve a subscription from the remote MQTT service to EMQX and forward the subscribed data.
Create MQTT Broker Source and Add It to Rule
Go to the Dashboard Integration -> Rules page.
Click Create in the top right corner of the page.
Enter the rule ID
my_rule_source.Configure the trigger source (data input) for the rule. On the right side of the page, under the Data Inputs tab, delete the default Message type input and click Add Input to create an MQTT Source.
In the Add Input popup, select
MQTT Brokerfrom the Input Type dropdown, and keep the Source dropdown at the defaultCreate Sourceoption. This demonstration creates a new Source and adds it to the rule.Enter a name and description for the Source in the form below.
Select the previously created
my_mqtt_bridgeConnector from the dropdown. Alternatively, you can create a new Connector by clicking the create button next to the dropdown box, using the configuration parameters in Create a Connector.Configure the Source information to complete the subscription from the external MQTT service to EMQX:
Topic: The subscription topic, supporting the use of
+and#wildcards.TIP
When EMQX is running in cluster mode or the Connector is configured with a connection pool, shared subscriptions must be used to avoid duplicate messages.
Here you can enter
$queue/f/#, indicating a subscription to all messages matching thef/#topic.QoS: The subscription QoS, select
0or1from the dropdown.
Use the default settings for other configurations and click the Create button to complete the Source creation, adding the Source to the rule data input. You will also notice that the rule SQL has changed to:
sqlSELECT * FROM "$bridges/mqtt:my_source"The rule SQL can extract the following fields from the MQTT Source, and you can adjust the SQL for data processing operations. The default SQL is sufficient for this example.
Field Name Description topic Originating message topic server Server address of the connected Source retain Whether the message is a retained message, value is false qos Message Quality of Service pub_props MQTT 5.0 message properties object, including user property pairs, user properties, and other attributes pub_props.User-Property-Pairs Array of user property pairs, each containing a key-value pair, e.g., {"key":"foo", "value":"bar"}pub_props.User-Property User property object, containing a key-value pair, e.g., {"foo":"bar"}pub_props.* Other included message property key-value pairs, e.g., Content-Type: JSONpayload Message content message_received_at Message reception timestamp, in milliseconds id Message ID dup Whether the message is a duplicate
Now you have completed the creation of the MQTT Source, but the subscribed data will not be directly published to EMQX locally. Next, you to create a message republish action to forward the messages subscribed by the Source to EMQX locally.
Create a Republish Action
Configure the rule action by switching to the Action Outputs tab on the right side of the Create Rule page and clicking the Add Action button. Select the
Republishaction from the Type of Action dropdown list.Configure the following fields for message republish:
- Topic: Enter
sub/${topic}, which means adding asub/prefix to the original topic for forwarding. For example, when the original message topic isf/1, the topic forwarded to EMQX will besub/f/1. - QoS: Select from
0,1,2, or${qos}. You can also use placeholders to set QoS from other fields. Here, select${qos}to follow the QoS of the original message. - Retain: Select
trueorfalseto confirm whether to publish the message as a retained message. You can also use placeholders to set the retain flag from other fields. In this case, you can selectfalse.- Since the data source is MQTT Source, the
${flags.retain}option is not applicable here. - You can also enter
${retain}to follow the retain flag of the original message, but it only works when the message is retained through the external MQTT service's retention mechanism, not when the original message is published to EMQX locally.
- Since the data source is MQTT Source, the
- Payload: Used to generate the payload of the forwarded message. Leave it blank by default to forward the rule output result. Here, you can enter
${payload}to only forward the Payload.
- Topic: Enter
Click the Add button to complete the action creation. You will be directed back to the Create Rule page and the new action will be added under the Action Outputs tab.
On the Create Rule page, click the Create button at the bottom to complete the rule creation.
Now you have successfully created the rule. You can go to Integration -> Rules to see the newly created rule, and on the Source tab, you can see the newly created MQTT Source.
You can also click Integration -> Flow Designer to view the topology. From the topology, you can see that the messages from MQTT Source are republished to sub/${topic} through the republish action.
Test the Rule with MQTT Broker Source
You can use MQTTX CLI to test the configured rule for bridging messages from the f/# topic in the external MQTT service to the sub/${topic} topic in EMQX. By publishing a message to the f/1 topic in the external MQTT service, it should be forwarded to the sub/f/1 topic in EMQX
Subscribe to the EMQX
sub/#topic:bashmqttx sub -t sub/# -q 1 -vUse MQTTX to publish a message to the
f/1topic in the external MQTT service:bashmqttx pub -t f/1 -m "I'm from broker.emqx.io" -r -h broker.emqx.ioYou can see the message published to the
sub/f/1topic in MQTTX, indicating that the message has been successfully forwarded from the external MQTT service to EMQX:bash[2024-1-31] [16:49:22] › topic: sub/f/1 payload: I'm from broker.emqx.io